Devcontainers

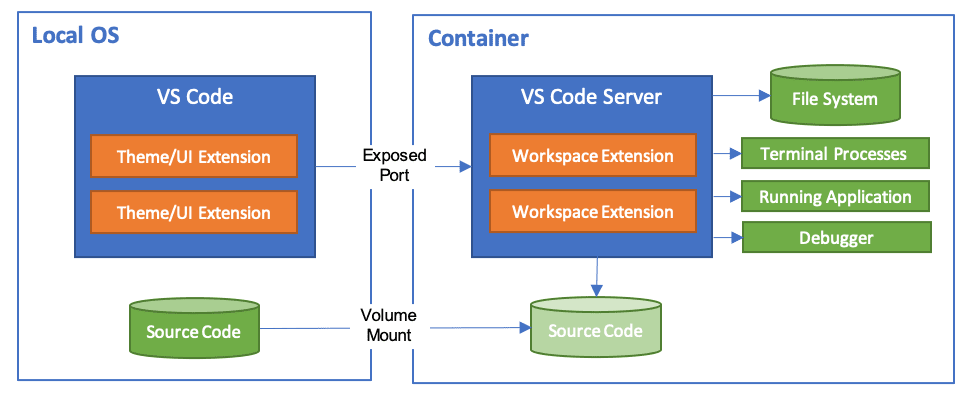
Devcontainer architecture diagram
I learned about the Visual Studio Code Dev Containers extension and I am a big fan of it.
For a long time, I maintained a ansible playbook of my development environment.
It was a lot of work to maintain and it was not easy to share with others.
Abstraction is valuable
Most of the time, I don't want to write complicated setup instructions for a project that have a tendency to become out of date as time goes on.
I want to ensure my team gets started quickly, repeatably, and easily.
My users and team members often just want to use the tool; they don't want to spend time setting it up.
Automating the setup is great, but it can be brittle and there are many edge cases. Abstracting away the setup of the development environment is a great way to solve this problem.
This is a problem to solve once, commit to version code, and to update/maintain in version control as needed.
5 Reasons to use Dev Containers
-
Consistent Development Environment - The devcontainer.json file defines the development environment for the project. This means that everyone on the team will have the same development environment. This is especially useful for onboarding new developers to the team.
-
Easy to get started - The devcontainer.json file can be generated from the command palette. This makes it easy to get started with a devcontainer.
-
Easy to share - The .devcontainer folder can be shared with the team within every git repository that requires certain software to be used. This makes it easy to share and document the development environment.
-
Private or public - The Docker image used can be hosted in the cloud or on-premise to suite your needs. That make it easy to have a common tailored image for your team needs.
-
Cross Platform - The devcontainer.json file can be used on Windows, Mac, and Linux. This makes it easy to have a consistent development environment across all platforms.
How to get started
Visual Studio Code has great getting started documentation on this topic, so I will primarily defer to them.
For Windows or Mac, install Docker Desktop. For Linux, install docker. Install Visual Studio Code. Install the Visual Studio Code Dev Containers extension.
Open the repo, click the pop-up that says open in containner, and you are ready to go!
Performance Gotchas
Use docker-compose to cache I/O senstive folders
Using a docker-compose file to start the devcontainer is a better option than just using the devcontainer.json file.
There are a couple benefits:
- Cache your local folders (
node_modules,.next,.venv, .mypy_cache,pytest_cache, etc.) on the host, so you don't have to download them every time you start the devcontainer. - Declare your complete development environment in docker-compose files.
Example
Generally speaking, I only change the name and service name in the devcontainer.json file.
I also add same service text as the name of the service in docker-compose.devcontainer.yml file.
Custom Software
Your team can install the software they need in the Dockerfile. This makes it easy to have a consistent development environment across all platforms.
Python, node, npm, rust, pipx, pre-commit, pdm are installed in the my devcontainer's Dockerfile.
This image is used for development of Python, Rust, and Node projects. I prefer to keep my operating system clean and use containers for development.
One could make separate images for each language, but I prefer to have one image for all my development needs as the size of this alpine based image is small enough for my needs.
Be careful of scope-creep and keep the image small and focused on the needs of your team. It is easy to add more software, but it is hard to remove software once it has been added. It is easy to say you will come back to it later, but you never do.
Windows Hosts
To help ensure the code application picks up the correct SSH agent, we need to tell Visual Studio Code to use the SSH agent bundled with Git for Windows.
ssh-agent
Open the settings pane in Visual Studio Code and search for remote.SSH.path.
Set remote.SSH.path to the absolute path of ssh.exe in Git for Windows.
Agent Forwarding
We also need to enable agent forwarding for all hosts in ~/.ssh/config:
Start the agent locally and add keys: eval "$(ssh-agent -s)"
Open VS Code from Git Bash so it sees the SSH_* env vars: code .
Reopen the workspace in a dev container.
Verify that SSH_AUTH_SOCK env var is defined in the container and try to list keys:
Alternatively, you can check if your ssh-keys are loaded