Virtualbox on Windows
Over the lasts year or so, I have explored ways to get my development environment consistent and deterministic. That has let me to package the tools and applications I use in a variety of ways. While I have control of my host operating system at home, that is not always the case.
This article is for those that have a Windows host and who desire to have a stable development environment. What do I mean by stable:
- Path is set by the development environment and not shared betwen Windows and the development (WSL feature to share path).
- Networking avoids dealing with nameservers and configuration files when dealing with private nameservers (Windows host configuration is a pain, WSL overwrites some host files)
- Consistent IP Address of development environment (Hyper-V guests not having static IP addresses across reboots)
I know I am not alone in having a Windows laptop that is operating while in a corporate network by being physical on-premise or by using a VPN.
My goal is to get a setup that works consistently for my use case. I don't want to have to adjust my setup anytime I change location.
We can do better, we can be lazier, we can have better things.
First I will explore what has not worked for me and why.
Docker Desktop
I explored devcontainers, which were generally sufficient in that they do perform their function. They encapsulated my development environment into a container and allowed me to run it. Version control repositories can contain them and that is great. It allows one to share a working setup.
In practice, they do work, but I found it very easy to have the startup time and development loop of using dev containers be quite tedious. It would take minutes to use an image in a source repository
that needs to npm install or pip install dependencies. These input/output expensive operations would take a very long time on Windows or Mac. Both use a virtual machine and mounts to present the docker container to the development environment.
You can cache this by setting up a volume within a docker compose file for the local environment, but you still have a loop where the initial setup of the repo takes too long for me. It is an interesting idea to get some initial integration and testing work done.
Hyper-V
Doesn't seem to allow for consistent IP addresses across reboots. I have not found a way to do this. I have tried to set up a static IP address on the guest, but it does not seem to work.
If you want a graphical session only, this is an option. That is not my use case.
I do not recommend this option.
Windows Subsystem for Linux (WSL)
WSL shares path with Windows. It consistently overwrites my wsl.conf and network configuration files on startup.
For those that are using command line interfaces (CLI) or simple tools, it is a great option. I have used it for that purpose and it works well.
When you start to have more complex DNS and networking use cases while on a VPN, I generally have had a bad time. I consider it a non-starter for my use case.
VirtualBox
This is my preferred option. It is not perfect, but it is the best option I have found.
I get the following benefits:
- Windows host applications (Outlook, Office, etc.) which, in a Windows dominated environment, are required for my work.
- Consistent networking and DNS resolution. I can use the same DNS servers as my host and do not have to worry about the VPN client.
- Port Forwarding to the host. For example, we can setup port 22 on the guest to forward to 3022 on the host, which allows consistent ssh connections, with no need to know the IP address of the guest.
- Pure Linux Environment. I can use the same tools and setup as I would on a Linux host, there is no interference with Windows.
- No Docker Desktop license required. Docker Desktop is free for personal use, but requires a license for commercial use. I do not have to worry about that with VirtualBox, since Docker virtualization on a Linux OS is free.
SSH port forwarding
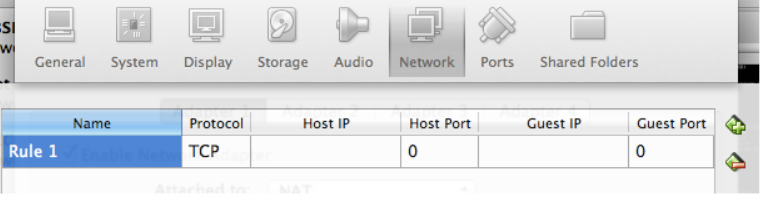
What we are going to do is pick a port on our Host, for example 3022, and forward TCP connections received on this port, to port 22/TCP (SSH) on our guest.
To do this, click on the green (+) button on the right.
Once you click it, a new row appears, ready to be filled out:
Port Forwarding
Fill it out as follows:
| Name | Protocol | Host IP | Host Port | Guest IP | Guest Port |
|---|---|---|---|---|---|
| SSH | TCP | 3022 | 22 |
Note:
- Host IP is set to nothing - this is on purpose, and is equivalent to saying 0.0.0.0. It means that ANY MACHINE that can access your Host on TCP port 3022 will be able to talk to the SSH on your guest. Be careful! 1
- Guest IP is left blank - there is no need by default to change this.
What the above rule means is:
"If a TCP connection is received on the Host on TCP port 3022, send it on to the Guest on TCP port 22"
To apply the changes, click OK.
You are back in the Network Settings windows. Click OK again to exit the Network Settings.
You will probably need to restart the Virtual Machine so that the changes are applied:
- Shut down the VM (Close -> ACPI Shutdown)
- Quit VirtualBox
- Restart VirtualBox
- Start the VM
Test the ssh connection
Voila! You are now able to connect to your guest via SSH, without having to know its IP address.
If you have multiple guests, you can setup multiple port forwarding rules, each with a different Host Port, and all having the same guest port (22, assuming you don't change that on the guest's ssh server).
SSH config file
This can be made one step easier by adding the following to your ~/.ssh/config file:
You can then connect to your guest by simply typing:
Example modular setup
In my case, I have multiple guests, so I have multiple entries in my ~/.ssh/config file, one for each guest.
My recommendation is to add the directive Include config.d/* in your ~/.ssh/config file, and then create a file for each guest in the ~/.ssh/config.d/ directory.
Verbosely, my ~/.ssh/config file looks like this:
Then my ~/.ssh/config.d/myvirtualboxguest file looks like this:
My ssh connection from the host:
The SSH config file is also read by tools such as Visual Studio Code, so the remote development extensions will use the same configuration.
Thanks and I hope this helps!